FrSky Smart Port Airspeed Sensor using Arduino

FrSky seems to have discontinued it’s Smart Port airspeed sensor which is a bummer considering how useful & insightful airspeed data can be when you’re testing an aircraft. I set out to build my own with an Arduino & a differential air pressure sensor, this DIY is quick, simple & involves minimal soldering.

Components:

  1. Arduino Nano [without headers]
  2. Pixhawk Airspeed sensor w/ Pitot tube [MS4525DO]
  3. 3-pin servo connector
  4. Heat-shrink tubing

Continue reading “FrSky Smart Port Airspeed Sensor using Arduino”

Arduino Enclosure – TiffinBOX

TiffinBOX (1)

I short my Arduino boards quite often, as unlikely as it seems. Mostly because my desk is littered with solder blobs and steel rulers and other desperate conductors of electricity. Although, the shorts haven’t caused anything more than harmless reboots, I figured I should get a case before my boards are fried. So I get on my usual online marketplaces seeking nifty cases for my Arduino Mega ADK and Uno. In the meanwhile, my boards are seeking shelter in a “tiffin box”. Given my very choosy nature, all the cases I came across on the internet were either utterly bland with no consideration to aesthetics of my liking or simply out of my budget. What do I do? I do what I always do, make my own. Having scrolled through pages of different products offered by a variety of sellers over a range of prices, I set some fundamental design rules based on my observations.

1) Most products use the mounting holes on the Arduino board to secure it to the case using screws and if you ever took a close look at the holes, you can see they are uncomfortably close to exposed solder pads and other active components. Another potential issue I found with screw-mounting the board is that if you ever drop the case accidentally, chances are, the screws might transfer the impact stresses to the board which does not sound very good. In my design, I constrain the board by slotting the protruding female headers through the top plate of the case, nothing “holds” the board, rather it simply “floats” in a tight tolerance space on foam padding. When you do drop the case, the impact stress are likely to travel through the case’s outer structure and not the board itself.

Continue reading “Arduino Enclosure – TiffinBOX”

DIY- Mini Quad Fiberglass Frame

Last year this time, a five-man team including me were working on a mini tricopter for a competition which later got replaced by the mini quadcopter for unexpected reasons. In the span of less than two months (Dec 2013-Jan 2014), a bunch of guys who had never before been around a multirotor and watched months of partial failure with the tricopter which barely lifted a foot off the ground and turned into a three bladed weapon of mass destruction, actually pulled off a working quadcopter that complied with the competition rules.
Honestly, trying to build a mini FPV multirotor with a flight time of 15 minutes is quite a challenge for any beginner. To build a mini quad that weighs in close to a kilogram to do 15 minute flights is out of question. But, we did manage to build a 330mm FPV quad that flew 10 minutes+ on a 3S 1Ah LiPo which is not really bad.
How we did it is not complicated as it is, but it took a lot of prototyping and design optimizations before we saw any real exciting number like 400g AUW and 10 minute flight times. I’m sure there are better contraptions than what we managed, but I’m going to share one crucial thing about our quadcopter, its frame, just in case someone out there is trying to build something quick & dirty similar.
The quadcopter’s frame was the centerpiece of this puzzle, it needed to be very light and very strong — classic engineering paradox — and the final product was a light 28g and about 50 crashes strong fiberglass frame. We improvised on most parts of the glassing process, but you don’t necessarily have to.

Continue reading “DIY- Mini Quad Fiberglass Frame”

DIY – xESC Adapter [Ver2.0 w/ATtiny45]

IMG_20140620_162901

Back in October 2013, I made an Arduino based adapter that allows unidirectional aeroplane ESCs to work with surface/pistol radios for RC cars and boats. I used a ATmega8 microcontroller in that adapter and honestly, that by itself was the size of an average ESC, I couldn’t really put it anywhere conveniently on my car due to space constraints and weight concerns (If I can cut down on 5g, believe me, I will).

Even back then, I was trying to make the code work on an ATtiny45 and I wasn’t sure what was going wrong until, Justblair pointed out in the comments that the Tiny45  doesn’t have 16-bit timers, only 8-bit ones and my code was based on the Arduino servo library which utilized 16-bit timers. He also suggested a solution to get my code working on a Tiny45 and that fix is the Servo8Bit library.

Continue reading “DIY – xESC Adapter [Ver2.0 w/ATtiny45]”

DIY- gForce meter 1.0 [UPDATE]

Image


So this time around, it’s another fun and functional microcontroller based DIY, a g-force measurement system with data logging to SD card.

HARDWARE USED:

1) Arduino UNO w/ATmega328P
2) 3-axis accelerometer breakout
3) SD card
4) SD card breakout w/level shifting circuit
5) LED Continue reading “DIY- gForce meter 1.0 [UPDATE]”

DIY- Helping Hand Tool

Image

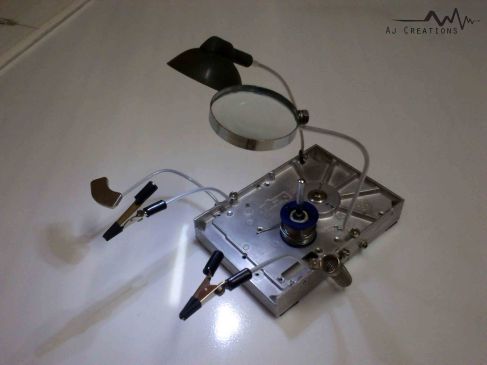
Helping hands are multi-purpose tool that are good to have and sometimes a necessity. They’re very useful for soldering electronic circuits and other applications where you would need a third hand to hold something or if it’s inappropriate to use your hands to hold a particular object. Not only does this DIY project look cool and save you money, you’re actually doing a favor to the environment by reusing scrap materials. This is a fairly elaborate and  simple DIY, even less than modest fabrication skills are good enough. Continue reading “DIY- Helping Hand Tool”

DIY- xESC Adapter [Ver1.0 w/ATmega8]

This Arduino based DIY is for everyone who would wants to run aeroplane ESCs with a surface radios. It goes in between the ESC and Rx. Although, there is already an adapter called Pistix available in the market for the same purpose, I couldn’t find any schematics or instructions about it to build one myself. With some help, I came up with something similar. How the adapter works: An aeroplane ESC needs 0% throttle indication at startup, but since a surface radio throttle is set at about 25% by default, it makes the ESC beep as a warning to set the throttle to 0%. For the aeroplane ESC to work, you can either mechanically modify the Tx by setting the default position of the throttle to 0% or if that is not possible, you can do it the software way; the adapter takes the 25% signal coming from the Rx and remaps it to 0%, as an indication of ‘no throttle’ to the ESC. Materials required: 1) ATmega8 or equivalent microcontroller- 1 nos 2) 16MHz crystal- 1 nos 3) 22pF ceramic capacitors- 2 nos 4) Servo extender- 1 nos 5) PCB Additionally, you’ll need a programmer to burn the code on to the ATmega8. I used an Arduino UNO board for the same. The Arduino code and the schematic can be downloaded from here– https://www.dropbox.com/sh/anvf4ibo4hesyj1/0zflxkuvDT?m Tested the adapter on my air boat, works flawlessly! I used an ATmega8-16PU microcontroller for this project, couldn’t get the code to run on an surface-mount ATtiny45-20PU, if some electronics genius on here can do that, it can physically reduce the size of the adapter to less than half. I couldn’t have done this project without help from Trishit Ghatak and PeterH (Arduino forum)

DSC_1639


Image